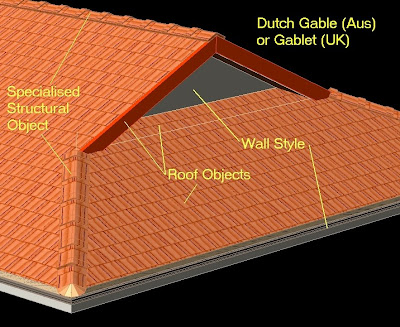
I'm not going to repeat the basics that are found in the AutoCAD help or the tutorials. I want to focus on the extra tips for use here in Oz (and anywhere else :-) Here I am going to focus on creating a Gablet (dutch Gable to some) (Gablet-UK) plus a couple of other tips including adding infill, the barge board and dealing with the overhang (underhang?). The methods here can be used for creating other roof shapes such as a Dutch Gable.. Roof types with 2 constant slopes like the 'Pizza Hut' roof or the 'Mansard' (or American dutch gable,) the flat top roof with a skirt around are better created using the 'Double Slope' option in the Properties Pallete.
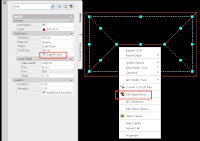 Create your rectangular roof with a hip end. Select the roof object & right click. Choose 'Properties' and on the tool pallete select 'Edges/Faces'.
(Note: This dialogue box shows the roof object tool's incomplete nature in several ways.) If you want to change the whole roof pitch DON'T do it here. You can only change one at a time.
Do it on the properties pallete under 'Slope'. You can however change overhangs 'en masse' by selecting one, several or all of the edges using Windows standard Control or Shift key options.
Now the lower panel shows a slope per selected edge and if you select multiple edges the lower panel greys out. Let's cancel out and get back another way so we know which edge we are editing.
Hint : If you can't change the slope in the properties pallete then it's possibly because you have edited an edge and added an additional individual slope so make your broad changes first before editing edges.
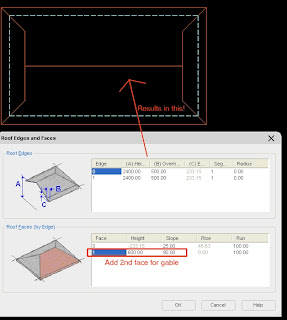 Cancel out and again select the roof again. Right click and select 'Edit Edges' and choose the right & left edges. Where-as before the dialogue box showed you all 4 edges, you now only have the 2 edges you selected. Select the first edge in the top panel and then click below the last entry in the 2nd panel under the 'Face' column. You have now added a 2nd plane for this edge. It will have the same slope as the main roof. Click in the slope column for this 2nd face and change the slope to 90 (vertical gable face). Now in the height column enter the height from the pitching (not eave) edge back to the face of the gable. I find this hit & miss but I get it eventually. (I'm sure you could do it mathematically.) Your height may be above the ridge so your gable may not show up. Adjust the height until it does. You now have your 'Dutch gable'. A reverse Dutch Gable can also be created by reversing the slopes for the 1st & 2nd slopes. i.e. A gable chopped short with a hip over.
Here is the dutch gable, used in the post war homes around here and every now and again copied today, but not often. Very easy to set up. Here I've easily adapted a curtain wall to act as my gable infill as the battens suit the repeated spacing. I had to give the CWA a tiny height and lower the baseline below the roof pitching line so I could right click and 'Roof Line /..." edit roof line and project into the shape of the gable roof.. The green barge on both sides of the gable is the SAME roof object. Adding a 2nd 0 slope at the same height as the main reverse dutch gable made the barge top section disappear where the gutter is. If I repeat this 0 slope on the other side the barge appears flat across this section. Interesting! Nice to have an object work with you but it's taken me years to learn these tricks to use.
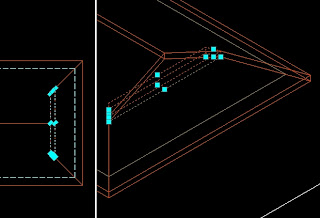
Now gables look better with an overhang so how do you do that (remember: The OOTB roof object will not overlap itself). Here's my best work around. Create a small section of roof (object) with slope to one edge and 90 slope to the other three. Position and shape it as the roof section that is overhung. i.e. the 2 side edges at 45d to align with the hips. In an 'isoview', align the new section to the existing roof. Make sure your roofs 'Edge Cut' are set to plumb (properties pallette).
The only drawback to this solution is a line on your aecElevations from the model but it's minor and you could pretend it's the flashing line for the gable wall over the roof sheet below.
Tip: If you have hatching to your roof material, setting the material hatching orientation to global will ensure the hatching to both objects align for your elevaiton.
Tip: Generally I position (in iso view) a wall style at the back bottom edge of this item, give it a very small wall height (10mm) and project the wall into the main roof object to create my gable infill. This peculiar wall style might have a frame & cladding componant so that I can apply a profile for the cladding. Note: If your gable wall is too high it will fail to project being taller that the lowest portion of the roof. It must be all below it (hence the 10mm height & bottom edge).
What about the Barge?
Gutter & fascia are taken care of by my wall style. But what about the gable end barges? I use another roof object! Draw a roof 50mm wide, set slope as per main roof and edit back & front edge slopes to 90 degrees. Ensure your roofs 'Edge Cut' are set to plumb (tool pallette – wish that was default!). Many use structural members and they have their strengths (getting quantities) but if you don't need Q's then the roof object is easier to adjust quickly because it maintains it's slope when the overall size is adjusted to suit different width. (It would be great if you had the edge option of 'Flat' along with 'Square' and 'Plumb' but as this is only for 3D and the unwanted portion of the barge dissappears into the roof then I am unconcerned ). Set your barge material on the first one (remember – no styles) and then copy around, adjusting as necessary. Remember to adjust the width in plan view and place using snaps in an 'isoview'. As the slope is set in the roof object it will keep that slope as you adjust the width - which is why I use them rather than a structural object. Update: You can use this option but I now use a structural object to get more detail for rendering.
Tip: Once you have built this 'circus', you can use an object anchor to tie it all together.
aecobjectanchorattach (alias to AOA or something simple). Object anchors are cool but they can cause unexpected behaviour in connected objects so keep an eye on them.
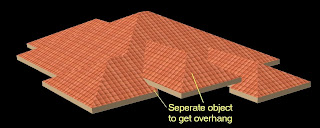 To get around the aecRoof Object's limitation WRONG of not being able to overhang itself UPDATE you can split the roof as I've done here. This takes a little planning but I've simply traced the main roof around the valley connection to the raised roof and given those valley edges a 90 (vertical) slope. Because the raised portion is a seperate roof object it can overlap as required.
Tip: When in the initial design phase, don't worry about untidy roof's if you have several roof objects overlapping. They won't show on your model or elevations as they will be inside the roof. That way, rather than convert to slabs, you can review the overall roof and perhaps replace it with one or more aecRoof Objects when the time comes to do documentation.
Verandah's?
Again I prefer to use a roof object. Like the gable overhang infill trick above, just isolate the slope to 1 edge and you can wrap around a main roof (wall). Of course without the ability to add vertices, make one mistake and you have to do it all over again. WRONG!
Tip: Create the roof with a 90 slope then edit the edges you need to slope. You will be editing less edges.
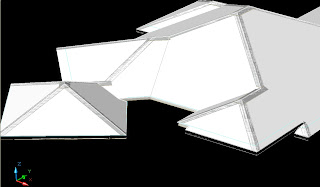 Roof hips for metal roof's Update: You can use this option but I now use a structural object to get more detail for rendering.
Here again I've found the Roof Object to be simple and versitile. Only necessary if you render or like your elevations to look complete rather than basic. Not having styles is a drawback but if you make the first one the correct setup and copy it around it's okay. These can be tricky and are fragile. You have two bottom edges with the roof slope on a 6 sided object. The other edges are 90 slope (vertical). Make the thickness around 5 to 10mm and sit on your main roof. Make the ridges thicker and they will sit above the hips like they do in real life. Ok I've also added a 50mm round structural object to get roller ridge capping which costs more but is much better looking.
There are a couple more small tricks to using the roof object successfully and I will try to be prompt in providing those secrets shortly.
Now why would you do all this and not switch to slabs? Well I'm just showing you the options 'is all'. Simpler roofs don't need the slab and it's easier to manage one object (KISS). The hips stay aligned to one another. Be free to continue using slabs if you have them mastered and are happy with them. If you want to stretch an edge and want to see the rest of the roof adjust automatically though, you may want to revisit the roof object.
Best to ya (Now when did I really post this one? :-)

