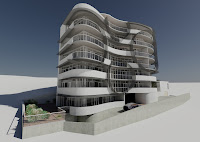
James posted some lovely images in the ADesk NG and I thought I'd like to add it to my blog as well as my wallpaper. This is modeled and rendered inside ACA2009 and shows that it's quite capable of a decent image for presentation.
One of the tasks for the image is as part of the presentation to the local authority to gain their support for a project that overreaches in some aspects of planning regulations.
A particular nicety in this image is the shade ribbon (a ribbon I like) that meanders around the balconies and brings about a wonderful interplay between the regular rhythm of the balastrade both glass inside the ribbon and solid outside, and the random travel of this shade device.
James has drawn 2 circles, one offset of the other, extruded both and then subtracted the inside from the outer resulting in a tube. A plan view PLine was also used to map out other flat sections, extruded to a solid, other solids used to subtract portions and after some union'ing the whole lot was converted into Mass Elements.
I've just derided the overuse of ME's in my last blog but here they are quite useful because as James points out, they obey the cut plane when displaying each floor. Now He doesn't use the PN but regardless, positioned correctly, the ME ribbons will 'cut' correctly in the plan views whereas using solids would not, having no intelligence of that sort. Also in this situation the ME 'Ribbon' style can be assigned an aecMaterial and different rendering options can be swapped quickly to explore ideas. With an ME style, you only need to deal with the aecMaterial and mess with the 'Render' material to do this. If you used solids here, you would either have to alter the actual render material used (loosing previous options) or create a new material and then remap it to each seperate portion of Ribbon each change. The style system of ACA works well here although masselements are now more primative than solids and not able to show a true curve being segmented. But if your settings are high enough (as here) this can be barely noticable.
Oh and James is working on a 64bit system with 8Mb of RAM. I doubt I could finish such a render on my 32bit home system with only 2Mb of RAM.
tips: remember that ME's can be easily turned into solids and visa versa. Select the object and RC for options.
 I should mention that the first image is an updated rendering. BACKGROUND command will allow you to choose options such as a background image (sky) seen above, or sun & sky with illumination (no background) seen right. If you want to place a sky picture in later you can use a solid colour which makes selection easier in a paint program like photoshop or free GIMP. The Background setting can be saved in a VIEW you create. If you added a camera you will already have a view by the same name as the camera. Using a camera can allow easier adjustment of the view and easier setup in plan view. I'm still playing with these settings and cannot get light shadows with a sky background as James managed to get in the top image here so I've gone to pasting skies in later in GIMP. I'll post some images later to illustrate more on these settings.


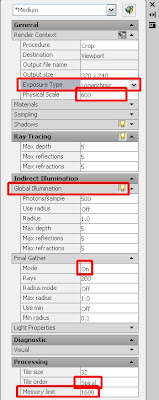 James' Tip: If you are not using sky illumination you may have trouble getting shadows looking anything but dark. Try GI (Global Illumination) and forcing FG (Final Gather) on (not auto) (more the FG than the GI). "It's the only way of achieving lighter shadows if you don't want the generic mental ray background (Sun & Sky setting). I also use the logarithmic exposure control over the automatic." You can see the Globe button lit up for GI to tell you it's on as the settings display whether it's on or off (no greying out functionality here). The interface design is rather poor on a number of the palletes in 2009 and I don't think it's really improved in 2011. Be aware too that these two settings will greatly increase your render times. For my day to day images I will not use them but if I am trying to render higher resolution and better quality for special shots I will turn them on, set the render to go when I turn the lights out and hopefully in the morning I am greeted with a fabulous image. If you are using RPC content then you may be warned to alter your Physical Scale setting. Be good if the defaults were set already. James thinks it's 1100. I thought I read 600. Oh! this pallet is raised by the command RPref . Sunproperties will open the sun pallete (I've alised it to Sun).
Other settings I know to mess with: If you have lots of RAM, you can try setting your memory limit higher than the default 1048. With 3.5Gb I have used 1800 but 2000 will crash. My home system with 2Gb will not get above 1600 (if I am lucky to get that). If you can get to 64bit and lots more RAM you will have better success trying to render larger images. At the top you can select from the presets. Medium will give you a reasonable quick render (5-20mins) but High or presentation turn on FG & GI and alter some of the other settings so only use them when you are ready for the final render. Of course the render time is greatly effected by what you are rendering, the materials applied, transparency, reflectively and the settings you have applied. When experimenting don't work on that 18 storey building! Try something small, even a few masselement boxes on a floor so you can get quick feedback.
Rendering is fun!! Go on. Have a go


