Remember when there were really big improvements being made!
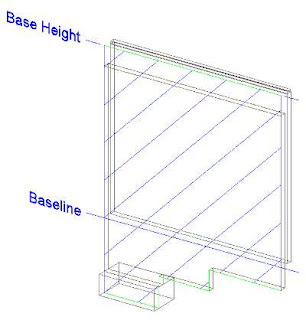 Here you right click and add/remove vertices. It's a bit tricky but you can use polar & otracking to line things up quite easily. If you need to, draw a line in elevation before hand to snap your points to.
But the footing componant does not follow the step! Only the bottom-most step will have the footing. So we need to do some further work to add the missing portion of the footing.
There are two methods that I know of.
- Break the wall for each step position and you will find the footing appears at each step OR
- Add a mass element, modelled to the missing portion of the footing and add it to the wall as a body modifer (to the footing componant).
How? Glad you asked!
The first one is simply done using the acad BREAK command which also works on walls. Break where each step occurs and then offset your wall as required. The cleanup rules will make the break invisible in plan view but you will now get vertical lines on your aecelevations though and have to deal with them. You can edit the elevation and delete the lines (preferred option) or you can tick the box to merge common materials but be aware that that I haven't found 'merge materials' very reliable. You will more than likely have to add back in linework that mysteriously goes missing. There is also some overlap of the footing missing so if you want the step to be accurate you would need to add portion of masselement as described in 2. below anyway but this way is quick and may do the job you need.
 2. Model the Missing Footing (Preferred Option)
Create an aecMassElement (ME) the shape of the footing you want to add.
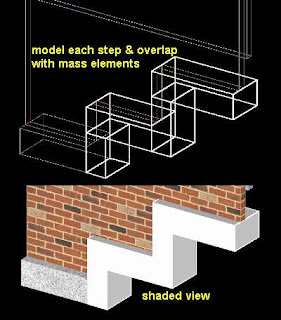
Step as required and finally for each length of wall, merge all the ME's together into one object so they become the one body modifier (unless you want to ckeep them separate). Select one ME & Right click, select boolean – union and select all.
TIP: If part of the ME has to blend with another wall that joins, you may want to keep the object for the next wall body modifier. Adding it to both walls can sometimes resolve issues at the corner.
Then right click on the wall and add the ME as a Body Modifer to the footing componant, deleting the ME after adding (tick box). You don't need any style for the ME, it's only a shape to add and the wall will retain the shape for future modification if the step or wall should change. If you need to alter the stepped footing, simply right click on the wall, select body modifier and edit in place, or even restore the ME to edit and add back to the wall again. This will give you an accurate model of the footing. TIP: while the 'bottom' of the wall is actually the bottom of the footing, any of the higher steps will be the bottom of the wall itself minus the footing so you need to take this into account when creating your steps.
TIP : you can use this same technique for adding extended portions of the footing for attached piers, columns etc.
No comments:
Post a Comment