 Ok so the last tip wasn't specifically for the aussie market or for ADT for that matter. So how about a wall style. The following image shows a basic section thru a very typical Aus house. This section involves only 4 AEC objects to create. (The roof & ceiling are primative for what you can do in 07 with componant slabs).
First let's create a wall that has
a 90mm external leaf that steps down to the footing
(typically 2c or 172mm)
a cavity (typically 50mm wide)
a 90mm internal leaf that stops wall plate thickness from the top
a wall plate at the top based in a typical 70x35 pine plate.
a footing that will step down further if required (with qualifications which will be discussed in a later post).
Further options will be looked at such as
a dado brick, a framed wall componant as a composite external wall & a skirting componant. The interface can be overwhelming & frustrating but it has a lot of power if you get into it's head.
a dado brick, a framed wall componant as a composite external wall & a skirting componant. The interface can be overwhelming & frustrating but it has a lot of power if you get into it's head.
Start with a standard wall in your drawing. Right click on it and select "Copy Wall Style and Assign", and rename the new style as you wish.
I suggest “230BkCav+Ftg” or maybe “BkCav+Ftg230w”
I suggest “230BkCav+Ftg” or maybe “BkCav+Ftg230w”
Unlike the OOTB examples, this wall is intended to use baseline as it's setout point which is along the external face. In the US their setout is often to the external of the internal timber frame and the external brick face is just that, a 'Facing' that just 'fits on' afterward. Here in the West we look after our brickies and ensure that the external leaf meets brick sizes and everything flows from that. Apart from keeping the bricky happy, the brickwork is to module and a lot neater than having odd cuts. Just another reason why the OOTB styles don't quite work the way we would want them to.
Also if you want to get accurate quantities then do NOT include other componants in the wall style that brickwork (ie leave out the footing and wall plate). At this point the scheduling features cannot distinguish between them (that I know) but you could simply create another wall style for the footing.
Ok so let's get started

External Leaf, let's assume it's cavity brickwork.
Important Tip: Priorities are very important for your cleanups. Search “Wall Cleanups and Priorities ” in ACA. I choose to follow the OOTB but you will need to add some componants or reinterpret to understand the terminology.
In the wall style editor on the componant tab change the default componant name to Ext Bk (I shorten most names!)
Width is 90 - easy!
Width is 90 - easy!
The bottom elevation needs to sit above the footing. As we are going to include the footing definition in this style we need to allow for the footing height. I am assuming a footing size of 450x300 which is typical here for a sandy site. So the bottom of the external leaf needs to sit 300 above the bottom of the aecWall. The top needs to be 3c plus the plate thickness DOWN from the wall top. 257+35mm = 292 (actually -292 as it's down).
With this wall selected (it's the only one) click on new componant (RHS) and it will assume the same settings for the next componant. Rename the next componant to Cavity.
Cavity is 50 wide.
Cavity is 50 wide.
Bottom is the same as external leaf (sitting on footing), top elevation is wall top.
TIP: Top of wall can be higher than the base height if the wall is extended to gable etc. Base height is the height shown in the properties tab.
Create another new componant.
Internal leaf sits on the slab or floor frame so set it's bottom elevation to baseline.
It's top elevation sits 35mm below the wall top.
Internal leaf sits on the slab or floor frame so set it's bottom elevation to baseline.
It's top elevation sits 35mm below the wall top.
Create another new componant. (Use this wall to create plate componant).
Wall Plate Bottom elevation is set at 35 below TOP of wall and top elev is set to Wall top. (Note: the plate will not follow a raking wall but there are ways of making it do so that I will show in a future article). The width is 20mm less than the wall it is sitting on. Lets assume it is placed central so the offset from the baseline is 90bk+50cav+ 10mm which is half of the 20 (90-70).
Wall Plate Bottom elevation is set at 35 below TOP of wall and top elev is set to Wall top. (Note: the plate will not follow a raking wall but there are ways of making it do so that I will show in a future article). The width is 20mm less than the wall it is sitting on. Lets assume it is placed central so the offset from the baseline is 90bk+50cav+ 10mm which is half of the 20 (90-70).
TIP: the order of creation is important when you create a special endcap as the order of creation of the “PLINES into endcaps” follows your componant list. So be wary of rearranging your componants if you have endcaps to apply other than standard.
Last we add the footing.
IMPORTANT TIP: The window will be placed in the centre of the widest componant so make sure that your footing is placed central otherwise in plan view you will find your windows mysteriously off centre to the wall.

The Footing needs to be set back from the baseline so we add an offset of ; The width is 450 so the offset is 450-230/2=110. The bottom elev is set at wall bottom and the top elev is set at 300 above the wall bottom. This allows us flexibility to offset the wall down to create stepped walls and the footing will follow (almost).
Now we have a complex wall that is adjustable in height. Set the height to ceiling course ht plus plate. The footing will only show correctly when the wall bottom is offset downwards. This cannot be set in the style but can be set in a tool pallette tool. If however you already have the wall in the drawing, if you right click on it and add selected, it will include the offset below the baseline. If not, to offset, you select the wall + right click and go to roof/floorline and modify floorline. Use the offset option and give it a – number to extend down (in this case typically -422).
We now have a typical wall style that when used gives us enough info to make a decent section as shown here and it's drawn with just 1 line. But be aware that the 'below cutplane' setting in the wall needs to be turned off so as to not see the footing in plan view. But this can also be used to make a footing & slab plan. 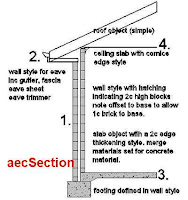

TIP: Setting materials in the material tab will help make things more automatic providing that you have the ByMaterial setting ticked but we will visit this important issue in another post.
Next : That's fine but how do I handle stepped footings, eaves/no eaves, raking walls and minor variations? How do I add a contrasting brick course, sills to windows, window surrounds? How do I add piers & holes? ................. to come..................stay tuned ............

Is this article helpful? Let me know!
2 comments:
I found this article to be very helpful. thanks.
Thanks Buzzie, you are welcome.
Post a Comment