Creating a Round roof
I'm sure you know that you can create a round roof, either as a complete circle or as part of an overall roof. When you select a round roof, each arc will be an edge with 2 end points and a mid point even though you may appear to have many hips. You can change the appearance for the smoothness of the curve (& number of hips) by editing the edge (Selecting the Right Roof Object and Right Click option) and increasing or reducing the number of segments (max 30) to represent the curve. Whilst 30 may look the smoothest in real terms, a round roof is built with a number of segments (hips) so you may be best to match the contruction number for an accurate representation.

 There doesn't appear to be any way to create a curved roof using the command line but you can create one by applying the Roof tool to curved linework or walls. Note that ;
- You cannot create a completely round roof from a circle linework or 2 Arcs so use 2 arc'd wall objects (2 arcs - because you can't create a completely circular wall with one wall either!).
- You possibly can't create a roof with a round portion from linework unless it's a closed polyline. (Well that's how I had to do it).

Well I have a simple idea to give you the exact data to be entered in the roof edge to get exactly the result you were expecting.
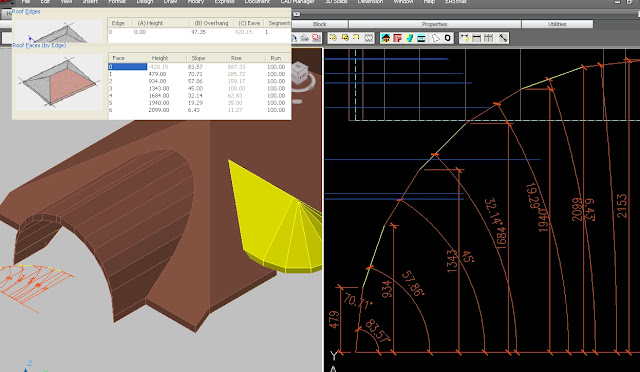 Draw your Arc in elevation view as it would appear adjacent with the model. Use the DIVIDE command to place Points around the Arc. Use an even number to land one point at the apex if you drew the whole Arc (I only drew half!). . Draw a PolyLine on a different layer joining the Points and then turn the other layers off. You should now be left with the Polyline stepping around your curve and be able to estimate whether you are happy with the resulting estimation of the curve. (This will be on your aecElevations as well as any rendered model.) If not - erase the points and use the divide command again increasing the points if you want a smoother curve. Once satisfied, you can dimension each point by angle and height as shown above and this will give you the numbers you enter into an edge on your roof object. OR... you could simply draw a polygon instead of the PLine and have your segments a lot quicker! Again adjust the number of sides until you are happy and then use the procedure above to measure each point to enter into your RO. He's pointed out this is also useful for Roman & Gothic arches. Thanks for sharing this cool tip Robert. As James points out, you can also attach an edge profile to an aecSlab to create the curve. Your slab would be a very narrow ridge at the apex and the curved profile both sides would give you your round roof. You can trim slabs with a pline to fit it into your main roof.
TIP: Be aware the height numbers are for a roof object with it's elevation at 0. If you need to adjust for a different baseline of your roof object, stretch all your dimensions (not the angle ones) down or up at once if necessary to add/delete any extra required.
With this technique, you can create an Eyebrow roof out of a normal gable roof as illustrated, or a barrel vault roof or your own special creation etc.
There is a limitation of the roof object shown here for the eyebrow roof. The Roof object thickness stays perpendicular to the main roof pitch and does not dynamically adjust with the changes in pitch as shown in the picture. For me this would be covered by a gable end treatment (Structural object) but would also be evident in any section. (Note that Sergej's updated Spirit roof tool has no problem with keeping the roof thickness constant!)
Inverted roof
 You can also create a Concave or Convex (bullnose) curve to your roof though I may use a wall style for these (see here and here). The other option as James has shared is to add a profile to a slab object so the slab itself is only a very small postion and the curve is achieved with the profile. Very easy to do if your roof line is constant.
Copy & paste Trick (sergej's tip)
 If you are looking at doing multiple pitches to more than one edge with the ACA Roof Object as shown above, it can get tedious real quick entering each height and pitch on a number of edges. However once you have entered a series to one edge, if you click in the first column of the face box and Control C to copy, you can then move to another edge and paste the same numbers (yes all three columns). If you had originally selected the 2nd (or more) edge already, it will be available in the dialogue box to paste to. Ok it's not perfect. Be nice to be able to alter a number of edges at once but it's quicker than doing each edge individually. Oh and it is a little temperamental sometimes and may need caressing to get the paste to overwrite.
Oh didjaknow?
- When you create a roof object, it remembers the last pitch for next time but not the last edge cut. (I think it writes it to the registry!)
- Once you edit some of the edges, adding gables etc, you may not be able to edit the main pitch via the properties pallete and may need to edit each edge at a time! Sigh! Therefore it may be quicker to remove a pitch (gable?) adjustment, change the roof pitch and then re-enter the gable.
7 comments:
Hey Nathan,
Like the tips, keep them coming. I admit to using roof slabs instead of roof objects. You can also create curved bull-nose or convex shapes with a roof slab edge style.
James
Great tips, thanks...an easier way to draw your segmented arch would be to draw a polygon from the center point and adjust the number of sides until it looked right and then measure the angles and heights. This would work for a roman or gothic arch, just trim out the piece you want and mirror.
Thanks Robert. Took me several reads to get it but that sounds like a good idea. So using the polygon gets you the segments quicker than drawing a pline point to point. Cool!
I'll add that in.
right, sorry if that wasn't clear, that bypasses the divide command and the pline, and you can quickly just draw another with more or less segments, thanks again for some great tips! I whole heartedly agree about the roof object! Autodesk should definitely update this thing. Even when I have a really complicated roof, i usually draw everything i can as a roof, then keep the original if i absolutely have to convert to slabs, it seems easier to regenerate than to edit roof slabs after they've gone awry.
Haha, yes it took me a couple of reads to 'get it' but you are right, it's a quicker way to do it. If I can I might do a pic to capture the technique and replace my old one. If you have a screen grab you can send me even better. I have added your tip into the blog itself and should go back and remove my (that) portion of my tip and replace it with yours. I want this to be a resource for best techniques using the RO. Very happy that this blog is providing useful tips. Since learning the trim trick, I don;t think I delete & recreate anymore. I generally trim to add vertices. I also have another couple of blogs in the works on RO for cutting holes in it so keep coming.
Haha, yes it took me a couple of reads to 'get it' but you are right, it's a quicker way to do it. If I can I might do a pic to capture the technique and replace my old one. If you have a screen grab you can send me even better. I have added your tip into the blog itself and should go back and remove my (that) portion of my tip and replace it with yours. I want this to be a resource for best techniques using the RO. Very happy that this blog is providing useful tips. Since learning the trim trick, I don;t think I delete & recreate anymore. I generally trim to add vertices. I also have another couple of blogs in the works on RO for cutting holes in it so keep coming.
I can say that these useful tips can be useful for many people all round the world.
I would like to appreciate you for sharing such an impressive and useful tips.
Post a Comment