Why Part 12? Why not move on? LOL?
Because I keep finding out things about this RO tool that make it so much more usable and if I knew at least some of this when I was starting I would have been more productive and enjoyed using it more. So... I want to let you know !!
This one (or two) is fairly simple and is more about technique. I've now known and used many times (Doug?) my trim trick but I've found out how to make it quicker and easier to use.

You ready??
Instead of using a line to trim, use a circle. Pick the corner for your centre and any diameter will do. Then issue the TRIM command, pick your circle as a trim object and then your roof eave line and you now have 2 vertices - voila! (Oh you haven't read my earlier post?) They didn't tell you you could do this?

Now it's been great to have someone working with me and my young gun, on teaching him this trick just assumed you could trim an internal corner -- he was successful, but didn't tell me! He just thought I knew! Here I am, going to the nearest external corner to drag (stretch) points around into position and all I had to do was trim in the inside turn and I was there. Sigh. So simple!

Either way, the beauty of using a circle is that you still have the original corner point preserved in the centre of the circle and using osnaps and the Stretch command you can quickly restore one of the points back to the corner. I was drawing extra lines before I learnt this trick!
The old idea was that if you had to edit the roof object, you either deleted it and started again or converted it to slabs. I've learnt so many tricks to this RO that were hidden that it's a long way off from being such a disposable object. With it's easily edited capability it's a keeper.
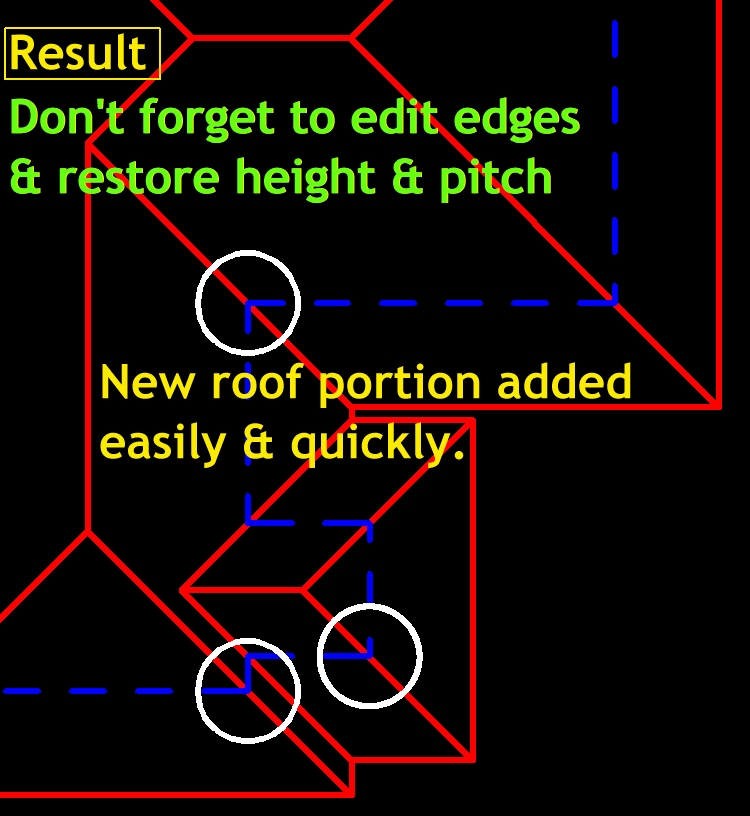
So after editing the edges (see below) we have a new roof.
Here we have an edited roof object, albeit a simple one for demonstration but I hope you can see you've no need to throw out that complex Roof object and start again or convert to slabs just because the client wants to add a sun roof extention.
Here we have an edited roof object, albeit a simple one for demonstration but I hope you can see you've no need to throw out that complex Roof object and start again or convert to slabs just because the client wants to add a sun roof extention.
I will even edit rather than delete just to see what else I might learn about this creature.
Now remember this tool was created for ADT1 (1999) and it hasn't been improved since. Wouldn't it be great if Adesk paid some attention to this tool of great promise.
Some more tips

Make sure when trimming you 'cut' the 'Eave' line not the gutter line.
Sometimes when stretching vertices back in line they may disappear if they have the same height, eave etc. You may need to re-order your movements to stop them from disappearing or add the eave or difference before moving back in line.
My young partner also showed me how to remove an unwanted vertice - simply select it and drag into another vertices and it is gone. I've already told you he showed me that Stretching a vertice is often successful where a drag won't budge it .
When you trim the Roof Object, the newly created edges will have their pitch at 90 and their elevation set to 0 and as the 2nd picture attests, that will muck up your roof object shape. Simply edit the offending edges and set to match your roof numbers and it will pop back to line.


Final tip for now (until another one is discovered).
When you trim a roof with it's elevation not at 0, like my 2nd floor roof within my 'multi-level in one file approach' system upper floor roof, your roof will be set back to 0 elevation. Once edited, simply retype in the elevation height (2nd floor level) in the properties pallete.
Ok also a BIG apology to anyone who has followed from my much earlier posts on this roof object. I have mentioned drawing your roof with or setting a slope pitch to 0 when I should have said 90d. Setting one side to 0 will wipe out any reaction to any other pitch unless that pitching line is above the other so for example when creating a one slope verandah roof you should be using 90 (not 0) and adding the pitch to the sloping portion only.
Ok also a BIG apology to anyone who has followed from my much earlier posts on this roof object. I have mentioned drawing your roof with or setting a slope pitch to 0 when I should have said 90d. Setting one side to 0 will wipe out any reaction to any other pitch unless that pitching line is above the other so for example when creating a one slope verandah roof you should be using 90 (not 0) and adding the pitch to the sloping portion only.
2 comments:
Hi Nathan! I have been reading your blogs for quite a while. I'm from NC here in the US. I do have a question for you. Sometimes when using the circle trick, it will trim the roof or sometimes ADT will crash. What would cause the program to crash? Have you had any issues like what I'm describing? Oh, I'm using ADT2007 by the way.
Todd
Great to hear from you. Actually I used to get the occasional crash on trimming when I first found it out back in ADT2006. I used to make sure I saved first as a habit but I have not had a crash now that I am using ACA2009. Thanks for reminding me as I should mention that so others will save first too. Thinking back I think the crash would happen if I tried to trim too fine or maybe it wasn't clear. Thinking about the RO as a math equation as I do I wonder whether that is it. Acad has had math issues before! I jumped from 6 to 9 only fiddling briefly with 7/8. Please let me know if you can reproduce with tiny circles etc and I will post results. Thanks for the feedback.
Post a Comment