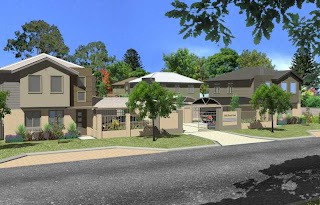
 There were some of us who were actually using the rendering tools in ACAD2006 (ADT6) or previous who felt neglected when it was all gone in the '07 release. Suddenly my whole efficient method of working on 3D's was gone. Not that it was all a bad thing as it's great to have an updated rendering engine (based on Mental Ray in Max) but my process no longer works in the new versions and I need to re-setup. The old engine, whilst it could do the job, is not at the level of the high end renderers, but it did a reasonable job quickly and efficiently for a fast turn around, rapid alteration and re-render which is what I need.
Of course the Biggie was not the rendering, which was replaced by something better, but the lack of any landscaping tool. I brought in my old LO's into 07 and they displayed and though they did render it wasn't properly and they did not 'face the camera'. So I was very excited to see that later releases have enabled the OLD landscaping objects (LO) to be used in the new engine, but as you have no landscaping creation tool, you have to create them in version 06 or previous. It doesn't have to be ADT as this is all AutoCAD stuff. So I thought I would share my tips on their creation and use, if you are still using v6 or prev. OR if you would like to bring them into ACA8 or 9. I am suspicious that v8 needs the service pack for the object to face camera but I'm not going to uninstall sp1 to find out.
Note of thanks: There is no mention of this improvement from Adesk but I assume that they did some work to allow this to happen so my thanks to whomever did the tweaks necessary.
There is also a good option to download the free RPCcreator from Archivsion which will allow you to create your own RPC objects from your own maps as well as have access to their large library. It's based on it's big brother, to be had for a price. I became obsessed with making my own maps so I have many that I wanted to use. I tried the RPCcreatorFree but I was impatient with the long process to create and was concerned about the hard coding of file paths but I could be wrong on that.Note of thanks: There is no mention of this improvement from Adesk but I assume that they did some work to allow this to happen so my thanks to whomever did the tweaks necessary.
Anyway onto revealing some tips.
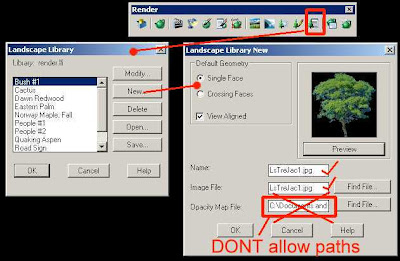
I have all my maps in folders (duh) organised how I like. In AutoCAD each folder path MUST be entered under OPTIONS- FILES-Texture Maps Search Path. It's important NOT to allow Acad to save the search path in the LO. as it hardcodes it, preventing you from altering your folder structure. Going to another office will 'break' your LO if the paths are different. I have set up several times over the years and if I decide to re-organise where and how I sort my maps, I don't want to break my LO. (See image below)You might choose to group them in folders, ie. Tree, Plant, People, Stone, Roof, etc. (I have my general textures with my LO textures) so you will add each folder to the search path.
Here are some great resources on rendering and the landscape tool in the OLD engine from Archidigm. 1,2, & 3 . Always great tips from Odin!
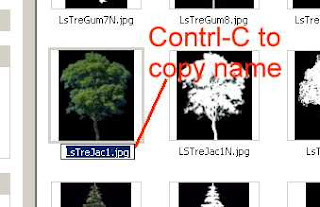
 In Acad2006 or previous use the Render toolbar or type _LSLIB and you are ready to create your object. DON'T use the the 'find file' button. Instead open windows explorer to your texture maps. Select your map and either right click and select rename or slowly double click and whilst the name is selected, CNTRL-C to copy the name. Now paste that into your 'Image File' space in Acad. If you do use the find file (why would you?) once you have selected the file, remove (cut) the file path information just leaving the file name itself.
  IMPORTANT: If your name won't stick it means your file search paths are not set properly. Having this in place will give you flexibility to change in the future and SAVE YOU TIME. Cancel out and add your map folder to the search path.
I name the LO the same as the jpg as it's easier to find. This name appears on the object when you are working in Acad so you know what it is. Tree1 is not as helpful as JacarandaTall so name your jpgs carefully and logically. Too long a name is also not helpful. You can see the code on my name which was before I found out about not coding the file path LS= landscape, Tre = Tree. If you use Windows folders to group like items then you don't need to do this, you just have to add each folder to your file path. (Did I emphasise this?:-)
You can use a variety of bitmap formats for LO's (& textures). Jpg's are efficient size. PNG's will display transparent when making a movie but the quality is so bad that you probably wouldn't worry about it. .png's are good for maps you place with Photosomething after rendering as they can carry transparency so you don't have to remove the white/black as an extra step.
Tip – DON'T use the library tool to insert your trees (except once). It's clunky and awkward. Instead insert your created LO's into a .dwg file and have them ready to cut & paste. It's much quicker, you can see what you are choosing and you can see them all at once. I have a file for Trees.dwg, Plants.dwg People.dwg etc. When you open it, select shademode and all your maps are visable (love to see RPC do that). Here you can size them to scale so that once you insert them they don't have to be resized (could be a metric issue as they are always too small using the inbuilt tool even at 100 scale). You can see in the adj. image there are blanks for some LO's. It's where the file path has been hardcoded and the map has changed location OR I have renamed the image along the way.
You could also arrange them on a predetermined layer if you wish. ie. Trees, Plants etc.
Tip: When positioning your LO, have it in shaded mode and you can 'place' a tree correctly in the ground (not floating). Very handy where people need their feet to be on the path etc.
In my working process of rendering inside ADT6, I have to work around the issue of not being able to render materials in X-ref's. So I had to 'map to a colour' anything that required a material or avoid X-Ref's. However, LO's do perfectly well across an X-Ref so I set up a landscaping file to hold all my trees and 3D cars. This means I can load it at anytime and run a render quickly after changes and not have a different file for CD's or Renders. So I only make changes once. Once the render process is finished, unload the landscape file and continue on. A client makes a change. Make the change, reload landscape x-ref and re-render and very quickly you can have a response. Have model layers seperate from any annotations or detail drawings also helps. I grew very impatient with the slow unresponsive Viz-Render link process so I am excited about the new engine and the potential to do everything in the one program. Maybe you have time to play around more than I do but If I took more time, I wouldn't be doing much rendering!
Now the interesting news is that once you have created your LO, you can bring it into v8 or 9 and use it in your renderings. There are some caveats and I haven't done enough testing to fully vouch for it but I do know that it works. I have found MR more fussier with your maps so it doesn't give great results on some of my homegrown maps but IT DOES WORK. I just have some tidy up to do.
Let me know if there is any part of this process I haven't made clear or you would like explained.

No comments:
Post a Comment